Complete it looks like this
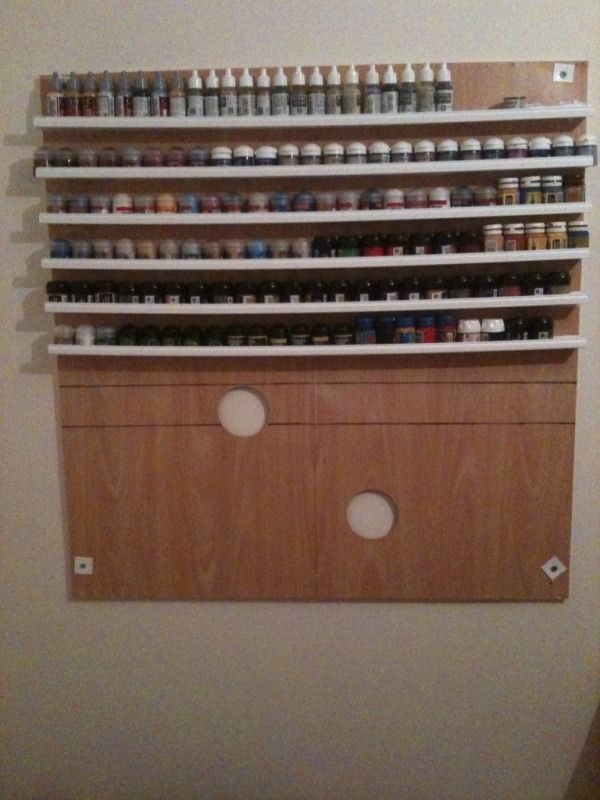
Now its far from perfect but it serves the purpose well. But I'm not sharing it just to say 'wooo look at what i got'. I thought i would share a bit of a how too in the hope it helps inspire some of you in need.
So here goes.
Material required
Backing board
upvc conduit (look around at home it usually holds the pipes etc. But don't nick that! the Mrs will be annoyed and its readily available from decent diy stores)
Some sort of adhesive. In the end i used an epoxy glue as it was the only thing that worked.
Sandpaper,
Saw
Tape measure.
Screws/drill etc for mounting to the wall.
Now i admit mines basically my MK1 version and i will replace it when time allows but it certainly services the need and holds well over 150 pots of varying sizes.
The backing board
For this you can use whatever is handy, mine was off the back of an old cabinet. You need something sturdy enough to resist warping and yet light enough to not require a crane to hold up.
Once you have acquired/scavenged said backing board, you need to rough up the surface to provide a bonding surface. Remember to dust off the wood dust.
Next measure the width of the board and make a note of it (this is to measure the 'shelves)
The next bit is a personal choice.
Measure the paint pots you intend to use and then add a centimetre or 2 (the extra is to allow room for pot removal). On your board make a number of marks this distance apart all the way down both sides. Then draw lines between them. These lines will provide a guide to where the bottom of your upvc racking will sit.
You should end up with something like this

Next up is the fun and naturally...the messy bit
UPVC shelving
The conduit i got was about 24mm deep. The best way of making sure it's suitable for your needs is to take a pot of paint with you and test fit it. I wanted a snug fit so my paints were held securely.
Now take that earlier width measurement of your board and along each section of the conduit mark out that measurement. Then take a hack saw and if you have one a mitre block and get hacking that conduit into conveniently sized pieces.
You should end up with a pile of plastic strips like this (feet are optional). I should probably mention here that the conduit comes in 2 pieces. A small upper cover and the main trunk piece. Its the main trunk piece you need. The cover can be used for scenery projects, reinforcing the back of the board or giant whippy stick fights with your fiancee if you so desire. You can guess which i used it for.

Now each of those sections will be very rough at the ends and you need to sand them smooth again. It will help with the bonding later and also help avoid any nasty accidents as it can be sharp. It also avoids any accidental mess after you have been a good hobbyist and tidied up late.
The next thing to do is adhere the shelves
Adhesives
Now i suggest taking a lesson learnt. Upvc and wood do not like each other and getting the right glue is a must. I suspect a hot glue gun would work but i don't own one. I probably could have afforded one with money wasted on adhesives but hey like i said...trial and error and MK1 shelving.
Substances i can guarantee wont work.
PVA
Super glue
No more nails...it DOES NOT glue anything to anything with surety...even after 24 hours bonding time.
What did work. 2 part epoxy glue.
Now this stuff is dangerous so please take care with it. It has a very short working time so you have to mix just enough for a single shelf at a time.
Don't get it anywhere you don't want it or you will never remove the stuff.
When attaching the shelves to the wood make sure to line up the bottom of the conduit shelves to the drawn lines. This will help to avoid any mishaps resulting in small spaces....nope didnt make any of the here *innocent whistle*
Once again stripey footed fiancee is optional though desirable if only to help hold pieces.

After a good amount of glue, struggle, swearing and general diy stropping you should end up with something like this. I allowed about 24 hours drying time for the adhesive.

Here its mounted to the wall using the normal rule plug, screw, drill type of set up. I hope i don't have to describe that to you. The little squares of plastic were used as the board was thin and the screws would have ripped straight through.
As you can see there is a small amount of sag in the shelves. This is something i hope to address in MK2 version when i finally tackle it. But it doesn't prevent the rack doing its job.
Mine is currently mounted in the space behind my hobby room door. Its perfect really as its a blind spot in the room unless the door is closed.
All that remains is to fill it up with paint and enjoy
As can be seen mine will hold everything from standard current gw pots through to older citadel pots, vallejo paints, tamiya and anything in between.
I hope this does indeed help and inspire some of you and if it does...its a job well done.
No comments:
Post a Comment